Tuesday, August 31, 2010

TSR Sept Reveal

My little girl on her first day of school and first year with uniforms. White polo shirts $5 at old navy and I was able to snag up 2 used uniforms during registration. The backpack was her pick, she wanted the over the shoulder one like her cousin's Dara and Phoma.

I love the texture and color of the navy ribbon in this kit. It was easy to create these flowers. Just ran a base stitch thru the ribbon, pulled the thread, pressed it down into a circle and one glue dot did the trick.


Papers: Sassafrass Lass Indie Girl
Ribbon: Pebbles
Chipboard flower: Sassafrass Lass Indie Girl
Misc: button, bling, thread
Punches: Fiskars Upper crest border punch
Stickers: Sassafrass Lass Indie Girl
Chipboard title sticker: Cosmo Cricket


It was late one evening when we stopped at the new playground area at Sedgwick County Park. All items from the kits except for the brown and green flowers and pearl embellishments.


Paper: Fancy Pants
Ribbon: FP My Family Woven Ribbon
Artist Edition Safety Pins: Fancy Pants
Other:Pearls
Flowers: Maya Road Velvet Pleated Blossom, Bazzill
Punches: Fiskars threading water,EK Success large scallop

Stickers: Fancy Pants


Making cards is not my favorite so I love it when the paper can be cut into the card itself. All I did was add the red and blue stickles and sentiment with stickers.


Paper: Fancy Pants My Family Strips
Pearls
Stickers: October Afternoon Mini Market Alpha, FP Red Alpha


This layout is based on Julie Bonner's sketch for TSR. Hands down the best crawfish restaurant i've ever eaten was in Vegas.


The journaling spots are so fun here. I also wanted to try a stitching template to create the top border


Paper: Jillibean Soup Pasta Fagioli
Stitching template:
Journaling Sprouts: Jillibean Soup Pasta Fagioli
Alpha Stickers: Doodlebug Loopy Lou(blue), MME Lush (brown), SEI (red)
Stars: JS Red Script Canvas Stars
Other: Thread, flower, button
Die: Nestabilities scallop circle


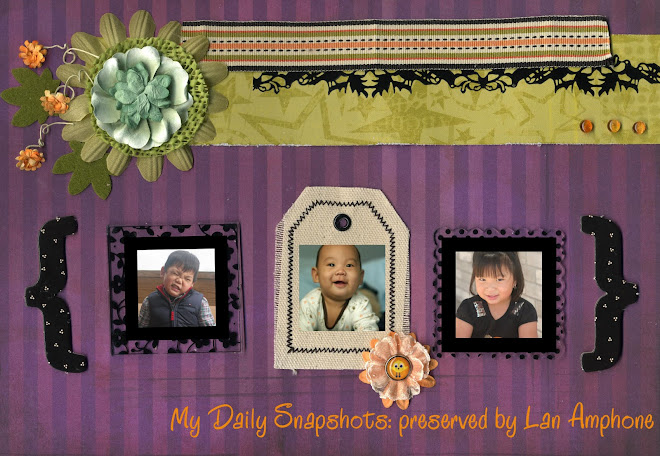
Aww...an a few pics of my kiddos. Colorful chair was on clearance at HobbyLobby :)


Paper: Jillibean Soup Pasta Fagioli
Dies: Scalloped nestabilities
Cricut: Basecamp font
Journaling Spot: Jillibean Soup
Flower: Maya Road Velvet Pleated Blossoms
Brads: Queen and Co
Punch: Fiskars Upper crest


And a set of three cards using Jillibean Soup


Landscape Photography

I took a phototography class from JR Cowell on landscape photography. Something totally different than doing everyday portraits. We met downtown Wichita at the Keeper of the Plains. Sadly I've lived here all my life and didn't even know how to get there so I googled it.


Yes..that's a piece of my hair in the image above...should have worn a headband knowing it was a windy day.


I learned the following...
1) I've been holding my camera upside down for the last 5 years
2) I shouldn't be squinting with one eye open thru the view finder
3) I can now use my left eye open...very new concept and hard to break old habits
4) It can get very heavy toting your tripod, camera bag, 3 lens, and a bottle of water around town on a hot day
5) You don't have to be looking thru the view finder to take the shot...leaving it on the ground is an alternative
6) What types of things to meter from
7) Be patient for bystanders to get out of your photo unless you want hippies and spandex in your photos
8) I've never shot at f/16 until today
9) Be open to your surroundings and what to look for
10) Always clean your lens and remove dirt and black spots before the shoot....learned after I uploaded all my pictures from the 3 hour shooting and found the same black spot on each image. Guess my eyes aren't as good as they used to be.

Thursday, August 26, 2010

Indigo is the new Black

It's sneek peak week over on TSR's blog and my layout using Sassafrass Lass Indi Girl is up. I am just loving the color Indigo!!! It's my new favorite to scrap with. This line of paper is just rich in color and beautiful. I love the chipboard flowers in the kit. I also used some of the new stamps as part of my journaling spot.

We did a couple takes with my camera on auto timer to get this photo...Micah was being a cheeseball as usual but I love it because that's just him in a nutshell.


Supplies: Sassafrass Lass Indi Girl (paper), Heidi(chipboard stickers), American Crafts (foam letters), Stamps (TSR), Scallop Punch (stampin up), Thread

Tuesday, August 24, 2010

Journal your Vacation

This is my last month designing for Sketches by Tamara. :( I've really enjoyed my term, it gave me the jump start I needed for my layouts and cards. And for the last project I have to share is the Journaling challenge.

It comes from Karen, one of the Design Team Members at Sketches! {by tamara}.

Journal about your vacation: More than who, what, where and when. But your thought about the vacation or a funny event during the vacation.

I chose to journal about getting lost in New York. It was the first time the three of us had ever been there and we were dressed up to go to a Lips show. We had the map out, our phones with google maps and gps...but we couldn't find the location. We made circles around the blocks and even asked for directions multiple times. We finally called the place for directions and they told us that they just moved locations a week ago and we were looking at their old address! It was quite the evening! Luckily we were still able to catch the later showing.

Sunday, August 22, 2010

Altered DVD Tin Tutorial

My tutorial is posted this week over at the Scrap-room's Blog

ALTERED DVD TIN TUTORIAL by Barista, Lan Amphone

Hello crafty people! Today I’ve got an altered DVD tin to share with all of you peeps. This tin measures 8”x 6” and I picked one up at my lss. If you can’t find one, substitute with any tin case or try a plastic pencil box found in the school supply area, they can be altered in just the same fashion.

For my project I used American Craft’s Dear Lizzy Line from TSR’s April kit.

Supplies Needed:
• DVD Tin (or pencil case)
• Coordinating pattern papers
• Cardstock or solid PP
• Piece of ribbon
• Flower
• Modge Podge
• Border punch/ or stickers
• Foam Tape

Step 1: Cut out all your pieces for the front cover and lay them out in the following order:

Solid Color #1 – 5.75” x 1.5”
Pattern #1 – 5.75” x 3”
Piece of matching Ribbon 5.75” long
Pattern #2 – 5.75” x 1”
Solid Color #2 – Punch a scallop strip 5.75” wide Pattern #3 – 5.75” x 2.5”


Step 2: Adhere each layer using Modge Podge starting from the top down. ( When I made mine, I cut my pieces longer to wrap around the outside edges but I would recommend just covering the top and leaving the sides and back unfinished)


Step 3: Attach flower cut from ribbon and two hand cut leaves.


Step 4: Cut a half circle out of cardstock and adhere with alpha stickers as shown. This completes the cover. Next we will work on the inside flaps. (note: I ended up not using the brads pictured below)


Inside Papers Needed:
pattern #4 - 8” x 5.75”
Solid #3 – 3” x 5.75”
Pattern #5 – 8” x 5.75”
Border paper or sticker


Step 5: Adhere Pattern #4 to inside left flap. Next we’ll create a pocket so you can slip a card inside. Take the solid 3” x 5.75” piece and score both ends at the ½” mark. Attach the flag border to the front top edge. Round the bottom corners and add two layers of foam tape to the back of the bottom edge and adhere to left flap of DVD tin with adhesive on the scored/folded ends.


Step 6: Adhere Pattern #5 to right side flap and you are done! Now just fill up your tin with goodies and give away to that special someone!


And here is a picture of another tin I made...thanks for sending the photo Pam!


We took the kids to see the Sorcerer's Apprentice last night. Kenzie has been asking to see it for the longest time. It was a great movie. Pax slept through almost the entire showing...I lucked out! I"m usually chasing him up and down the isles.

I had a flash/metering/light photography class yesterday and right as I was starting up my car to go...my engine wouldn't start...the batter died again! This is the 2nd time. So I had to call hubbie to come back home and drive me. I was half an hour late but was still able to learn a few pointers.

Thursday, August 19, 2010

Tamara's Card Sketch

This week's challenge is a card sketch. I like how the sentiment wraps around the corner. I was creating this at work one day and didn't have any tools with me to create the flower. So I took my Victoria's secret ultra-moisturizing hand and body cream lotion (My Desire) that was sitting on my desk and traced the cap several times to create circles. Then I just started playing around with it and folded the sides in and this is what I came up with. Check out what all the other designers did with it
here.


Tuesday, August 17, 2010

Imaginesce August Sketch

Made another layout with the cute Scooter's vacation line from Imaginesce...this time using a sketch from their blog contest. Photos from when we went to visit Auntie Kim & Ryan in CO earlier in the year.


Thursday, August 12, 2010

Groovy Girl

Here's my double page recipe card I made for the scrap-room using KI Memories Groovy Girl line. I love the journaling cards and softies that came with the kit. A pretty basic design but the papers bring such pop of color, you don't need much more.

After Kenzie learned how to ride her bike without training wheels on the 2nd attempt, she kept saying, I can go 2 wheeling now mama! lol.

Wednesday, August 11, 2010

Imaginisce + Pagemaps

Pagemaps is having another sketch contest on their blog. This is what I made with it during my lunch period yesterday. Received this adorable scooter's vacation line by Imaginisce from my friend. I just *heart* the red camera icon on that paper. It's so cute and perfect for my photo of when I met up with my New York scrapping friends.

Back to School

The kids have exactly one week left of summer break. I for one am all excited to get them back into a regular routine. This year Kenzie will start all day kindergarten and Micah will go to preschool two days a week.

Here's a layout I made using Kenzie's preschool picture from 2 years ago. It's this week's recipe challenge over at sketches by Tamara. We had to use these three items:

*Bling
*Banner
*color green


Supplies:
Paper - October Afternoon Cherry Hill (TSR Aug '09 Kit)
Flag Banner Sticker: Sassfras Las Cherry Delicious (TSR Aug '10 Kit)
Topiary Spruce bling it - Basic Grey (TSR July '10 embellishment add-on)
Alphas: American Crafts & Cosmo Cricket

Sunday, August 8, 2010

Beat the heat

Just returning from a trip to Carthage, MO for the Marion day festivities. When I was younger my parents would take us every year and we would camp out in tents. Now with three kids of my own and a heat wave in the 100's...how I'm so grateful for hotels and swimming pools....and working A/C's!


Tuesday, August 3, 2010

August Layout Sketch

Your inspiration this week is a layout sketch. Be sure to click on over to sketches by Tamara to see what all the other designers did with it.


I used the BoBunny line for my photo of Paxton. Everyone comments on how dark he is...they think I let him suntan all day long, lol...but he's just naturally dark.

Related Posts with Thumbnails